
So, you’ve got these cool old beams in your house and want to show them off? That’s awesome. But then comes the tricky part: dealing with the ceiling and walls around them. It’s not as simple as just leaving them bare. You’ve got to figure out how to make the drywall meet those beams without looking messy. This guide is all about figuring out the best ways to get that finished look, focusing on plastering around beams so everything looks intentional and clean. We’ll walk through the whole process, from prepping to the final coat of paint.
Key Takeaways
Before you start plastering around beams, you need to get the workspace ready by protecting everything from dust and debris, and then carefully remove the old ceiling material.
You’ll likely need to adjust any exposed electrical wiring and might add furring boards to give your new drywall something solid to attach to.
Using special drywall corner bead, like vinyl tear-away bead, is a pro trick for getting clean, smooth edges where drywall meets the wood beams.
For a more dramatic look, consider using shadow bead to create interesting visual effects and define the space between the drywall and the beams.
The final steps involve installing and finishing the drywall, taping any seams, mudding, sanding, and then priming and painting for a polished appearance.
Preparing To Expose Wood Beams
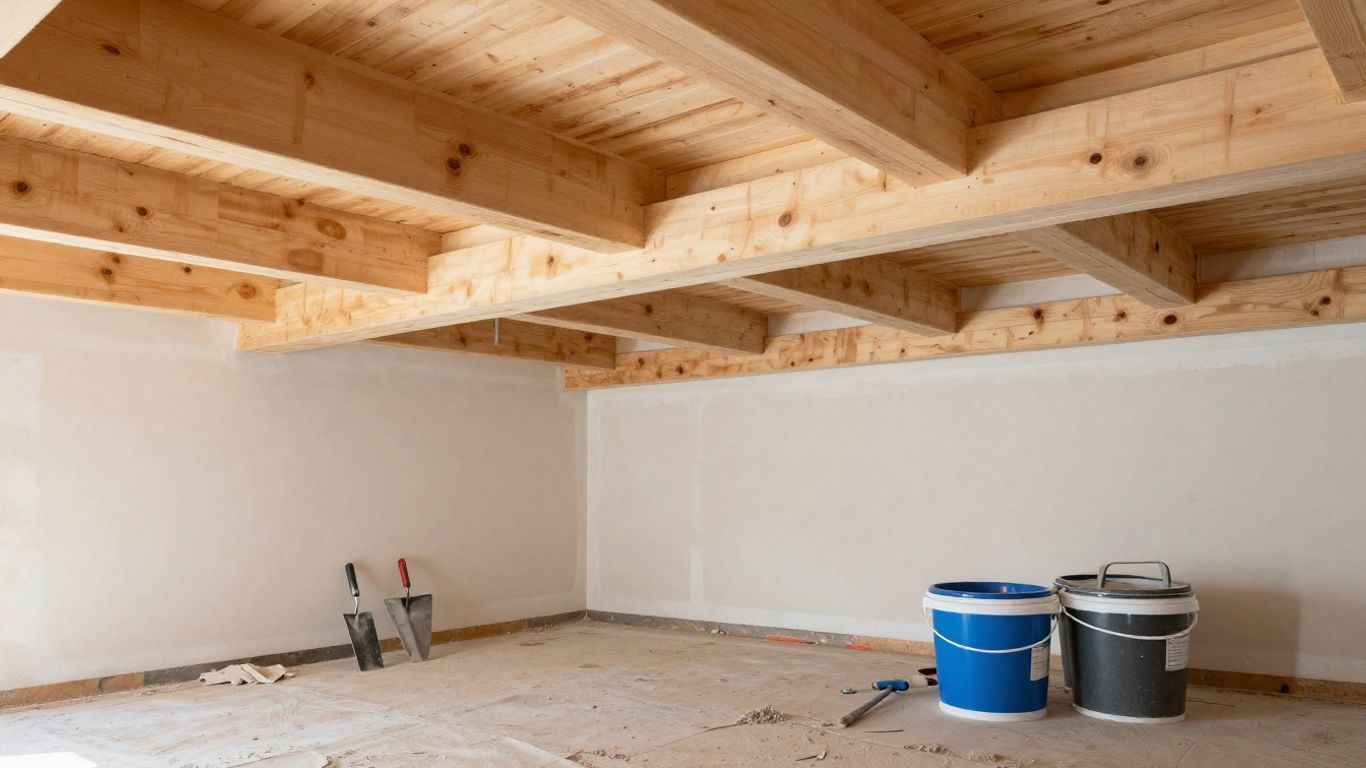
So, you’ve decided to uncover those gorgeous, old wood beams hiding above your head. That’s a fantastic choice for adding character and history to your home! But before you start swinging a sledgehammer, there are a few things you’ll want to get sorted. It’s not just about tearing down the old ceiling; it’s about making sure everything is safe and ready for the next steps.
Assessing Existing Ceiling Structures
First off, take a good look at what you’re dealing with. Is it a simple plaster and lath ceiling, or is there a more modern drop ceiling in place? Sometimes, older homes have multiple layers of ceiling material. You’ll want to figure out how the current ceiling is attached and what’s directly above it. Understanding the existing structure will help you plan the safest and most efficient way to remove it. You might find old wiring, plumbing, or even forgotten insulation up there, so a thorough inspection is key. It’s also a good time to check the condition of the beams themselves. Are they solid? Any signs of rot or damage? A little detective work now can save you a lot of headaches later.
Gathering Necessary Tools and Materials
Once you know what you’re up against, it’s time to gather your supplies. You’re going to make a mess, so be prepared. Think about safety first: you’ll need sturdy eye protection, a good dust mask (seriously, drywall dust is no joke and can really mess up your hair and lungs), and maybe even hearing protection if you’ll be doing a lot of hammering. For the actual demolition, a hammer, pry bar, and a utility knife are your best friends. You’ll also need heavy-duty plastic sheeting and painter’s tape to cover everything you don’t want to get covered in dust and debris – furniture, floors, doorways, vents, you name it. Don’t forget trash bags or a dumpster for all the old ceiling material. A shovel might come in handy for scooping up the bigger piles.
Protecting Your Workspace From Debris
This is where you go into full-on protection mode. Covering your floors with thick plastic sheeting or ram board is a must. Then, drape plastic sheeting over any furniture or items you can’t move. Tape it securely with painter’s tape. Seal off doorways and any vents leading to other parts of the house. The goal is to create a contained demolition zone. You’ll be surprised how far dust can travel, so err on the side of over-protection. Think about where you’ll be disposing of the debris too; having a large trash barrel or a designated area outside will make cleanup much easier. It might seem like a lot of prep work, but trust me, it’s way better than spending days cleaning dust out of every nook and cranny of your house.
Remember, this part of the job is often the messiest and most time-consuming. Taking your time with the preparation and demolition will make the subsequent steps much smoother and cleaner. Expect the unexpected; old houses love to keep secrets!
Removing Old Ceilings and Lath
Pulling down an old ceiling is usually the messiest step, but it’s the one that finally gets you closer to those old wood beams. If your home is anything like mine, you’ll be surprised by what you find above the plaster—random wood blocks, ancient insulation, or even old artifacts. For this part, patience is more important than speed.
Safely Smashing and Pulling Down Plaster
First, make sure to protect yourself with a dust mask, goggles, and gloves. Old plaster can get everywhere, and little pieces fall unpredictably.
Lay down heavy tarps or ram board on your floors. Tape plastic over any doorways and vents, because the amount of dust is wild.
Begin by scoring the edge of the ceiling with a utility knife where it meets the wall. This keeps bits of wall paint and finish from tearing off with the plaster.
Use a hammer and a pry bar to knock through the plaster. Work in small sections, letting debris fall right into a trash barrel or onto your tarp for easier cleanup.
Some spots might be stubborn—expect plaster as thick as two inches in places. Keep your coolest playlist on repeat, because this part drags.
Pulling down plaster will probably take longer and create more dust than you think. If you feel overwhelmed or it seems endless, that’s normal!
Detaching Lath and Nails From Beams
Once the plaster is down, you’ll see thin wood strips (called lath) tacked up everywhere.
Take your pry bar and gently work each strip loose from the ceiling beams.
Nails can be the real time suck—each one gets removed by hand. Use a nail puller where possible to avoid damaging the beams.
Some lath comes out in big chunks, but sometimes you’ll have to pick at it. Be careful around electrical wires and pipes—plenty of old houses have random surprises up there.
Lath removal takes longer in older homes (more nails)
Watch for brittle, splintery wood
Old lath sometimes comes away easier if you hit it from above instead of below
Identifying and Removing Additional Framing
After the lath is gone, check for any extra boards, framing, or weird blocks that don’t belong—especially if previous owners added faux ceilings or framed down to lower the height.
Anything not original to the structure can usually go, but check for wires or pipes before prying out blocks
Remove loose scraps, random filler wood, and any non-structural elements in your way
Some old ceilings are hiding multiple layers of framing, so pace yourself
Here’s a simple breakdown of the process and tools you’ll likely need:
Step | Main Tools | Safety Gear |
|---|---|---|
Smash Plaster | Hammer, Pry Bar | Dust Mask, Goggles |
Remove Lath | Pry Bar, Nail Puller | Gloves |
Extra Framing Removal | Hammer, Crowbar | Gloves |
By the time you’re finished, you’ll have a dusty, open ceiling, visible beams, and maybe even a few blisters. It’s hard work, but seeing those beams come to life makes it absolutely worth it.
Addressing Electrical and Framing Adjustments
Okay, so you’ve cleared out the old ceiling, and now you’re staring at a beautiful mess of wood beams and, uh oh, wires. This is where things get a little more involved, but don’t sweat it. We just need to make sure everything is safe and ready for the new drywall.
Rerouting Exposed Electrical Lines
First things first, safety. Those exposed wires need to be dealt with. If you’re not comfortable with electrical work, now’s the time to call in a qualified electrician. Seriously, it’s not worth the risk. If you are comfortable, the goal is to get those wires tucked up as neatly as possible, usually running them close to the top of the beams or joists. You’ll want to make sure they’re properly secured and out of the way of where the new drywall will go. Sometimes, you might need to run them through conduit for extra protection, especially if they’ll be visible in certain areas.
Installing Furring Boards for Drywall
Since you’re working around beams, the existing framing might not be perfectly flat or at the right depth for drywall. That’s where furring boards come in. These are typically thin strips of wood, like 1x2s or 2x2s, that you attach directly to the beams. They create a consistent surface for your drywall to attach to and can help build out the space needed for utilities.
Measure and Mark: Figure out where your drywall will sit and mark the beams accordingly.
Attach Furring: Screw the furring boards securely to the beams, making sure they are level and plumb.
Create Depth: Leave a small gap (around 1/4 inch) between the furring boards and the top of the beams. This helps create a slight shadow line later and gives you space for things like junction boxes.
Creating Space for Utilities and Junction Boxes
As you’re adding furring boards, keep an eye on where your electrical boxes and any other utilities need to go. The gap created by the furring boards is often just enough to house junction boxes or other small electrical components. You might need to get a little creative with placement, ensuring everything is accessible but also hidden behind the new drywall. Proper planning here prevents headaches down the line.
Remember, any electrical work should be done to code. If you’re unsure about any part of this, it’s always best to consult with a professional electrician to ensure everything is safe and up to standard.
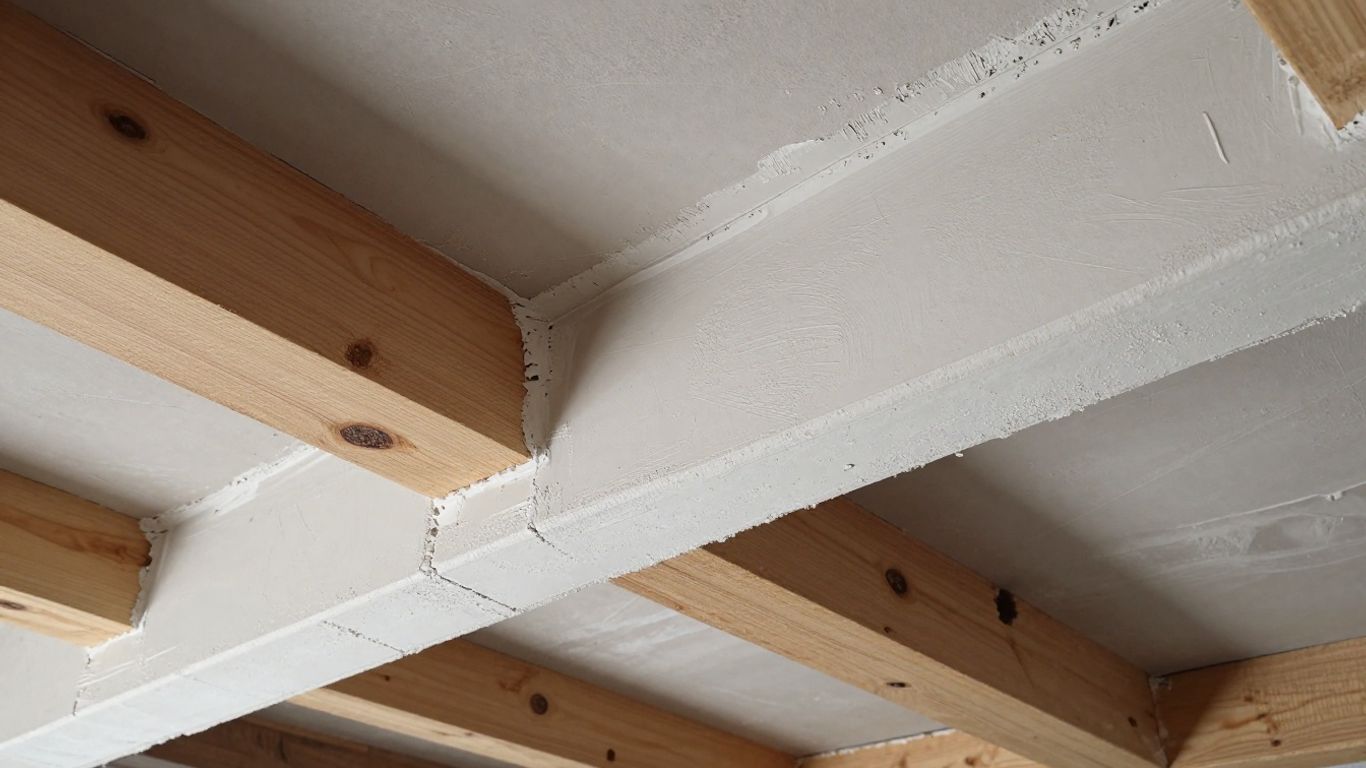
Finishing Drywall Around Exposed Beams
Alright, so you’ve got these cool exposed beams, and now you need to make the drywall meet them without looking like a total mess. This is where things get a little more detailed, but it’s totally doable. The goal here is to get a clean line where the drywall stops and the wood starts, and to make sure it stays that way.
Using Vinyl Tear Away Bead for Smooth Finishes
This is a pro trick, and honestly, it makes a huge difference. You’re going to want to use something called ‘Tear Away L Bead’. It’s this flexible vinyl strip that’s a lifesaver when your beams aren’t perfectly straight. Because wood and drywall can move a bit differently with temperature changes, using regular paper tape in these spots can lead to cracks down the road. The vinyl bead lets them move independently, which means no cracks. Plus, it has this tear-off strip that protects your beam while you’re mudding. Once you’re done, you just peel it off, and bam – a super clean edge.
Here’s the basic rundown on how to get it on:
Leave a Gap: Make sure there’s a small, consistent gap between the edge of your drywall and the beam. This is where the bead will sit.
Apply the Bead: Fit the vinyl flange of the Tear Away Bead into that gap. Then, use a spray adhesive (like 847) and some staples to attach the bead’s ‘mud legs’ to the drywall. Space your staples about every six to eight inches.
Mud and Sand: Apply your joint compound (mud) over the bead, feathering it out onto the drywall. Once it’s dry, you’ll sand it smooth. Then, carefully tear off the protective strip.
Applying Bead to Gaps Between Drywall and Beams
This step is really about getting that bead to sit right. You’ve already made sure there’s a gap, which is key. The Tear Away Bead is designed to fit snugly into this space. The vinyl part goes into the gap, and the other parts stick to the drywall. It’s important to get a good adhesion here, so don’t skimp on the spray adhesive and make sure those staples are holding it firm. This bead is what bridges the difference between the flat drywall and the textured or uneven surface of the beam, giving you that crisp line.
Miter Cutting Beads for Beam Corners
When you get to a corner where a beam meets another beam or a wall, you can’t just run the bead straight. You’ve got to cut it. The standard way to do this is to miter cut each piece of the Tear Away Bead at a 45-degree angle. This way, when you put the two pieces together at the corner, they form a neat, clean 90-degree angle. It takes a little practice to get these cuts perfect, but it’s worth it for a professional look. You’ll do this for every corner around every beam where it meets the drywall.
Creating Shadow Effects With Drywall
Utilizing Architectural Z Shadow Bead
So, you’ve got those cool exposed beams and joists, and you want the drywall around them to look just as interesting, right? Forget those super clean, sharp edges for a second. We’re talking about adding a bit of depth, a bit of drama. That’s where something called ‘Architectural Z Shadow Bead’ comes in. It’s a special kind of trim that helps create a gap, a shadow line, between your drywall and the wood. It makes the beams pop and gives the whole ceiling a more finished, intentional look. This bead is your secret weapon for making those transitions really stand out.
Achieving Eye-Catching Shadow Details
To get this shadow effect, you’ll need to plan ahead. When you’re putting up the drywall, you’ve got to leave a specific gap between the drywall and the beam. The size of this gap depends on the Z Shadow Bead you pick out. Think of it like setting up a stage for your beams. You’ll also need to cut the bead itself at a 45-degree angle, especially where you have corners, so it fits nice and snug around the beam. It’s a bit like doing a fancy puzzle. Once it’s cut and in place, you’ll usually stick it on with a spray adhesive and then staple it before you start mudding. This whole process gives you that cool, recessed look that makes the beams seem to float a little.
Connecting Walls and Ceilings With Shadow Bead
Sometimes, this shadow effect isn’t just for looks. In some cases, it’s actually pretty practical. For instance, if you have drywall partitions meeting an exposed wooden ceiling, using a shadow bead helps connect the two surfaces smoothly. It stops paint from getting messy where the wall meets the ceiling and, importantly, it helps prevent those annoying cracks that can show up later as the house settles or materials expand and contract. It’s a bit of a tricky job, and it takes some careful work, but the result is a really clean, professional finish that holds up over time. It’s a way to make sure everything looks good and stays that way.
Here’s a quick rundown of what you’ll need:
Architectural Z Shadow Bead (various sizes available)
Drywall panels
Measuring tape
Utility knife or drywall saw
45-degree miter saw or miter box
Spray adhesive (like 847)
Staple gun with half-inch staples
Drywall mud and taping tools
Remember, precision is key here. Taking your time with the measurements and cuts will make a big difference in the final appearance. It’s better to measure twice and cut once, especially when you’re dealing with these specialized trim pieces.
Finalizing the Drywall Installation
Alright, so you’ve got your drywall sheets cut and ready to go. This is where things start to look like a real room again. It’s not just about slapping up Sheetrock; it’s about making it look good, especially with those beams hanging around.
Installing and Taping New Sheetrock
First things first, get that new Sheetrock up. You’ll want to screw it into the furring strips or whatever framing you’ve got in place. Make sure it’s snug but don’t overtighten, or you’ll crack the paper. When you’re putting up the sheets, especially in those tricky spots between beams, try to keep your cuts as clean as possible. You’ll have a lot of seams to deal with, so the neater you are now, the less work you’ll have later.
After the sheets are up, it’s time for taping. This is where you cover those seams. You’ll use drywall tape – either paper or mesh – and spread a layer of drywall mud over it. Think of it like icing a cake, but for your walls. The mud goes on, you embed the tape, and then smooth it out. This step is super important for making sure those seams don’t show up later.
Start with the longest seams first.
Overlap tape at inside corners.
Use a wide knife to smooth out excess mud.
Let each coat of mud dry completely before the next.
Mudding Gaps Between Drywall and Walls
Now, about those gaps. You’ve got drywall meeting the beams, and maybe other parts of the ceiling. This is where you’ll use a product like Vinyl Tear Away Bead. It’s a flexible plastic strip with a tear-off edge. You attach it along the edge where the drywall meets the beam, using spray adhesive and staples. This bead does a couple of things: it gives you a straight line to follow with your mud, and that tear-off strip protects your beams from getting mud all over them. Once the mud is dry, you just rip that strip off, and you’ve got a super clean edge.
You’ll likely need multiple coats of mud to fill these gaps and seams properly. Patience is key here. Rushing the drying process or not applying enough coats will lead to cracks and an uneven finish down the line. It’s better to do it right, even if it takes a bit longer.
Sanding, Priming, and Painting for a Clean Look
Once all your mudding and taping is done, and everything is dry, it’s time to sand. This is where you knock down any high spots or ridges left from the mudding. You’ll want to wear a mask and maybe even goggles because, trust me, drywall dust gets everywhere. After sanding, wipe down all the dust. Then, you’ll prime the whole area. Primer helps the paint stick better and gives you a uniform surface to paint on. Finally, you can paint. You might need two coats of paint to get everything looking just right, especially if you’re painting over a dark color or those taped seams.
Use a fine-grit sandpaper (around 120-150 grit) for the final sanding.
Wipe down surfaces with a damp cloth after sanding to remove dust.
Apply a quality primer before painting.
Consider using a paint roller with an extension pole for high areas.
Wrapping Up
So, you’ve tackled the plaster, dealt with the beams, and hopefully ended up with a ceiling that looks pretty great. It’s definitely a job that takes some patience, and maybe a bit more dust than you bargained for. But seeing those old beams exposed, showing off their history? That’s a pretty cool reward. Whether you went for a clean finish or a bit of a shadow effect, you’ve added some serious character to your space. Now, go ahead and enjoy that newly revealed ceiling – you earned it.
Frequently Asked Questions
What’s the first step to exposing wood beams in a ceiling?
Before you start, you need to protect your space. Cover the floor with protective material like ram board and then tarps to catch falling debris. Also, seal off any openings like doors, vents, or outlets with plastic sheeting to keep dust from spreading everywhere.
How do I remove old plaster and lath from the beams?
You’ll need tools like a hammer and pry bar. Start by scoring the ceiling where it meets the wall. Then, carefully smash and pull down the plaster in small pieces, aiming for a trash barrel below. After the plaster is down, use the hammer and pry bar to remove the lath and any nails still attached to the beams.
What if there’s extra framing or old materials attached to the beams?
As you remove the plaster and lath, you might find extra boards or framing that were added over time. Take your time and work in sections. Carefully remove these additional pieces to fully reveal the original beams. It’s important to check for safety as you go.
How do I handle electrical wires when exposing beams?
Once the old ceiling is down, you’ll see any electrical lines. You’ll need to reroute these wires, usually as close to the floor boards as possible, to keep them out of the way. This is a good time to make sure all wiring is up to code and safely managed.
What’s the best way to finish the drywall where it meets the beams?
To get a clean look, leave a small gap between the new drywall and the beams. Use a special vinyl bead, like Trim-Tex Tear Away L Bead, to cover this gap. This bead flexes with the materials and helps prevent cracks. It also protects the beams from getting mud on them during finishing.
Can I create a decorative look with drywall around the beams?
Yes, you can! Using something called Architectural Z Shadow Bead can create interesting shadow effects where the drywall meets the beams. You’ll need to cut the bead at angles to fit around the beams and attach it before applying mud. This adds a unique design element to your ceiling.