
Living in an older Bristol home is pretty cool, right? You get all that character and history. But sometimes, that history comes with a side of loose plaster. It can be a real pain, looking unsightly and potentially becoming a safety issue. If you’re noticing cracks, bulges, or even sections that seem ready to fall, you’re probably wondering how to fix loose plaster Bristol. This guide is here to help you figure out what’s going on and what you can do about it, whether it’s a small patch job or a bigger project.
Key Takeaways
Loose plaster often happens because of moisture, age, or movement in older buildings. You need to figure out why it’s loose before you can fix it properly.
If plaster is bulging or sagging, it’s a sign it’s not stuck to the wall anymore. Sometimes you can inject it, but usually, you have to take the loose bits off completely.
Small cracks might be fixable with filler, but bigger or growing cracks often mean you need to replaster. Make sure you sort out the reason for the crack first.
A ceiling that’s coming down is a serious safety risk. Get it looked at by a professional right away and don’t go under it.
For Bristol’s older homes, especially Victorian ones, using lime plaster is often best. It lets the walls breathe and handles movement better than modern plaster.
Understanding Why Plaster Fails
Older homes, especially those charming Bristol properties, have a lot of character, but that character can sometimes come with plaster issues. It’s not magic, and it’s not usually a sign of a major structural catastrophe, but understanding why plaster starts to fail is the first step to fixing it. Think of it like a leaky faucet; you need to know where the drip is coming from before you can stop it.
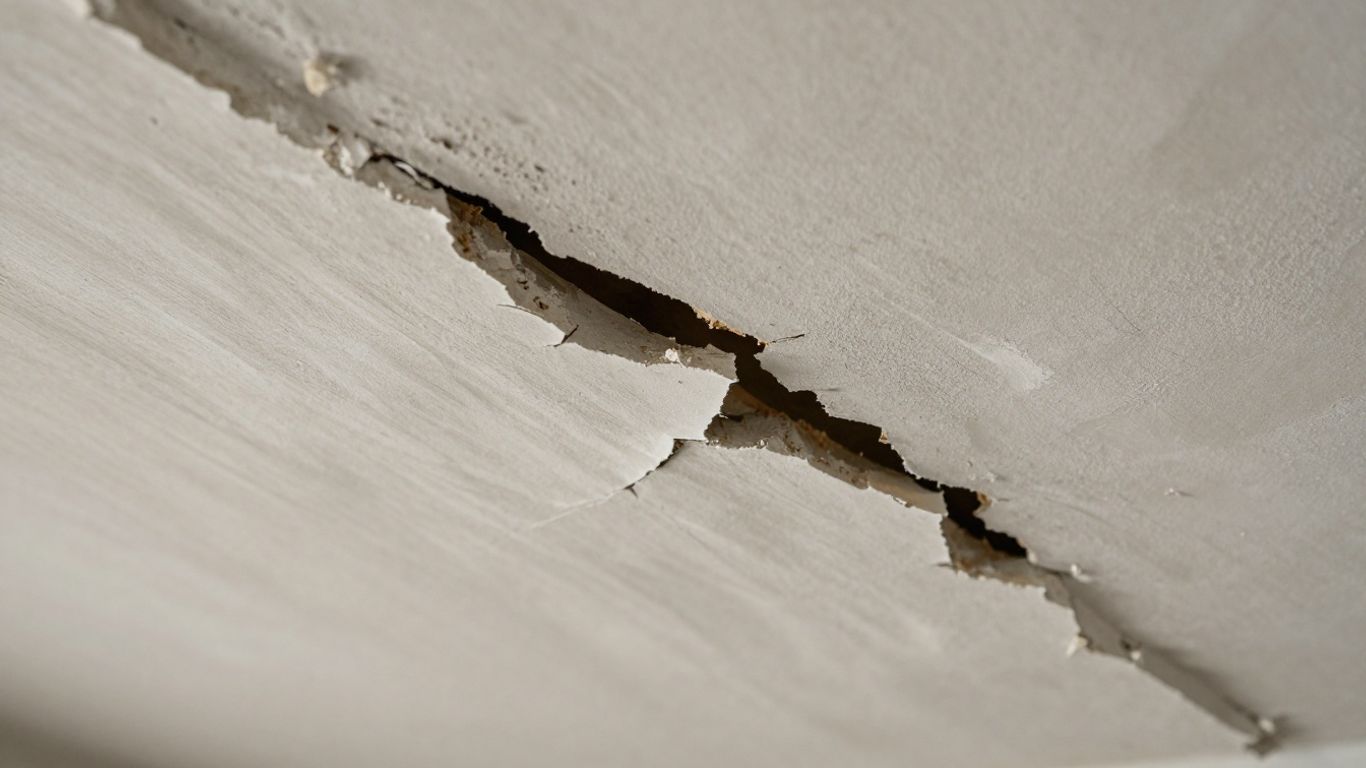
Identifying Bulging or Sagging Plaster
This is probably the most obvious sign that something’s up. You might notice a section of your ceiling or wall starting to droop, or perhaps a distinct bulge pushing outwards. This usually means the plaster has lost its grip on the underlying lath or substrate. It’s like wallpaper peeling away – it’s no longer attached properly. Water damage is a big culprit here. A slow leak from a pipe or the roof can saturate the plaster, making it heavy and weakening the bond. Sometimes, the plaster itself was applied too thickly, and the weight just becomes too much for the structure to hold, especially on ceilings. You might also see this with age; the nails holding the lath can rust, or the timber itself can degrade, leading to a loss of adhesion.
Recognizing Blown Plaster and Adhesion Loss
‘Blown plaster’ is a term you’ll hear a lot. It’s essentially plaster that has detached from the wall or ceiling behind it, creating a hollow space. You can often identify it by tapping the wall – a solid plaster will sound dull and firm, while blown plaster will sound hollow. This loss of adhesion is almost always due to moisture getting behind the plaster. It could be from damp walls, condensation, or even just the general passage of time. If you try to patch over blown plaster without removing it, you’re just putting a band-aid on a much bigger problem, and it’ll likely fail again pretty quickly.
Assessing Age-Related Deterioration
Let’s face it, older buildings settle and shift. Plaster, especially the traditional lime plaster used in many older Bristol homes, can become brittle over time. The key materials it’s attached to – often wooden laths – can also degrade. Wood shrinks and swells with moisture changes, and over decades, this movement can stress the plaster. The fixings, like nails, can rust and weaken. This gradual breakdown means the plaster loses its bond with the lath. It’s not usually a sudden event, but a slow process of deterioration. While some minor cracking is normal, significant sagging or bulging points to a more serious adhesion failure that needs attention.
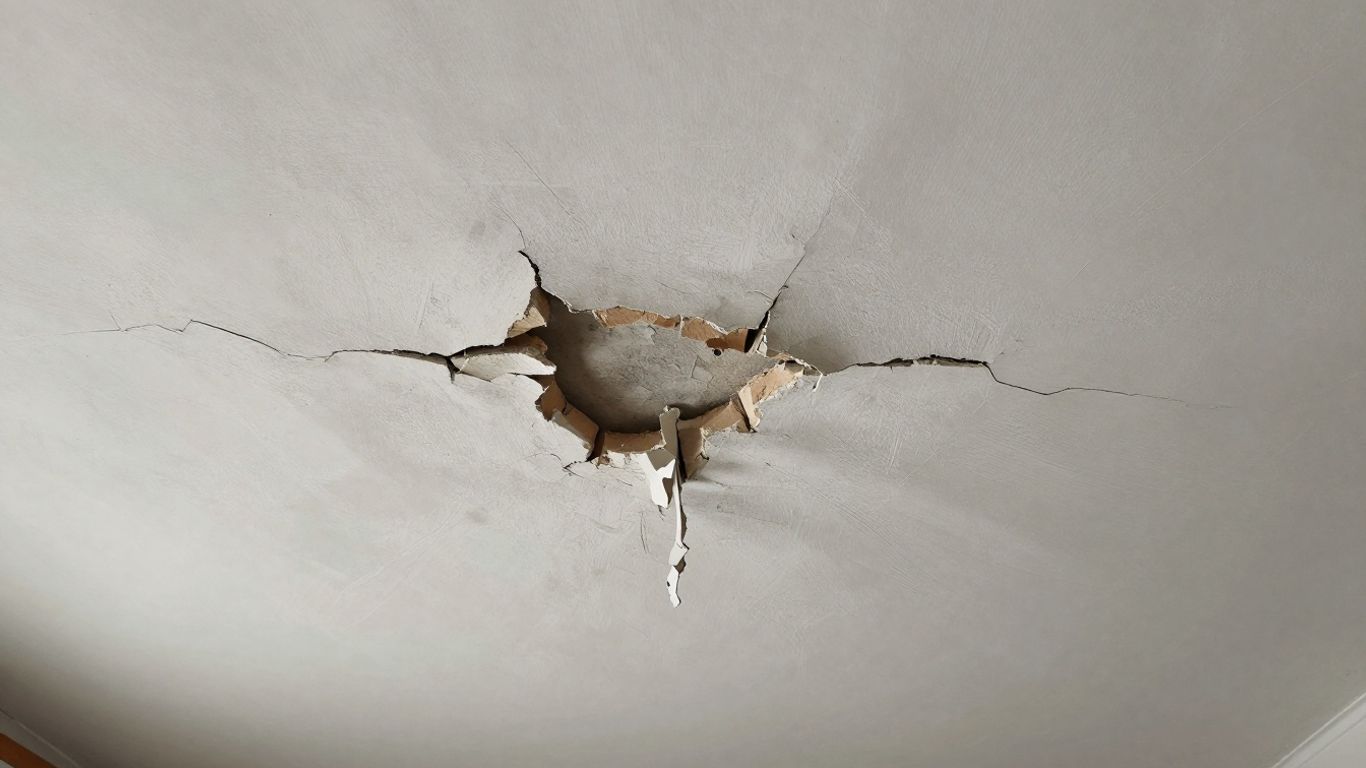
Addressing Detached Plaster Issues
When you notice plaster starting to pull away from the wall or ceiling, it’s a clear sign that the bond between the plaster and the underlying surface has failed. This isn’t just a cosmetic issue; it’s a structural one that needs attention before it gets worse. Ignoring detached plaster can lead to larger sections falling off, potentially causing damage or injury.
The Necessity of Removing Detached Plaster
Trying to reattach plaster that has already lost its adhesion is usually a waste of time and materials. Once the bond is broken, it’s very difficult, if not impossible, to restore it reliably. Think of it like trying to glue a piece of paper back onto a wall after the glue has completely dried and peeled off – it just won’t hold.
Hollow Sounds: Tap the plaster gently with a knuckle. If you hear a hollow or drum-like sound, it means the plaster has detached from the substrate behind it. This is often called ‘blown’ plaster.
Cracks and Gaps: Look for visible cracks, especially around the edges of the detached area, or gaps where you can see daylight or the underlying material.
Sagging: In severe cases, especially on ceilings, the detached plaster might start to sag noticeably.
For anything more than a tiny, hairline detachment, the only real solution is to remove the loose plaster entirely. This might seem drastic, but it’s the only way to create a stable base for a lasting repair. You need to get back to solid, sound plaster or the original substrate (like lath or brickwork).
Preparing the Substrate for New Plaster
Once you’ve carefully removed all the loose and blown plaster, the real work begins: preparing the surface for the new plaster. This step is absolutely critical for the new plaster to stick properly and not fail later on.
Clean Thoroughly: Brush away all dust, debris, and any crumbling material from the exposed area. A vacuum cleaner can help get the fine dust.
Check for Moisture: If moisture was the cause of the original failure (which is common in older homes), you must address that problem first. Fix any leaks, improve ventilation, or deal with rising damp before you even think about replastering. Painting over a damp problem will just lead to the new plaster failing too.
Apply a Suitable Primer/Bonding Agent: Depending on what you’re plastering onto (old plaster, brick, lath), you’ll need to apply the correct primer or bonding agent. This helps the new plaster adhere to the substrate. For very porous surfaces or old lath, a specific bonding compound might be needed.
Preventing Future Adhesion Failures
Adhesion failures in older homes often stem from a few common culprits. Understanding these can help you avoid the same problems down the line.
Moisture: This is the big one. Water penetration from leaky roofs, faulty gutters, or rising damp can soak into the plaster and weaken its bond over time. Condensation can also play a role, especially in poorly ventilated areas.
Poor Original Application: Sometimes, the plaster was never applied correctly in the first place. This could be due to a dusty or contaminated substrate, improper mixing of the plaster, or applying it too thinly.
Age and Movement: Plaster, especially older lime plaster, can become brittle with age. Building movement, vibrations, or even just the natural expansion and contraction of materials can cause stress that leads to detachment.
Addressing the root cause of the plaster’s detachment is just as important as the repair itself. If you don’t fix why it failed in the first place, you’re just setting yourself up for another repair job down the road. It’s a bit like putting a plaster on a cut without cleaning it first – it won’t heal properly.
By taking the time to properly remove the failed plaster and prepare the surface, you’re laying the groundwork for a repair that will last. It might take a bit more effort upfront, but it’s the best way to ensure your walls and ceilings stay in good condition.
Repairing Cracks in Older Plaster
Cracks in the plaster of older Bristol homes are pretty common, and honestly, they can be a bit of a headache. Sometimes, they’re just little surface things, almost like a spiderweb, and other times they’re wider gaps that make you worry about what’s going on behind the scenes. The key is figuring out if it’s a simple cosmetic fix or something that needs more attention.
When to Repair Cracks Without Replastering
For those tiny, hairline cracks that don’t seem to be getting any bigger, you can often get away with a simpler repair. Think of these as the ‘cosmetic’ issues. If the plaster is stable and the crack isn’t moving, a good quality filler can do the trick. You’ll want to clean out the crack a bit first, maybe with a stiff brush, to get rid of any loose bits. Then, apply your filler, let it dry completely, and sand it smooth so it blends in. A flexible filler or decorator’s caulk can work well here, especially if you plan on painting over it soon.
Techniques for Filling Wider Cracks
When cracks are a bit more substantial, say wider than a hair but not huge, you’ll need to do a bit more prep. The usual advice is to ‘rake out’ the crack. This means using a tool, like a putty knife or a specialized crack rake, to widen the crack slightly at an angle. This gives the new filler something to grip onto. You’ll want to remove any loose plaster and dust. Then, you can fill it, usually in layers if it’s deep, allowing each layer to dry. Once it’s all dry, sand it down so it’s flush with the surrounding plaster. Getting the texture right to match the rest of the wall can be the tricky part here.
Addressing Cracks from Structural Movement
Now, this is where things get a bit more serious. If you’re seeing cracks that are wide, jagged, or seem to be reappearing even after you’ve filled them, it could be a sign of underlying movement in the building. This could be anything from slight settlement to more significant issues. In these cases, just filling the crack is like putting a band-aid on a broken bone – it won’t last. You really need to get to the bottom of why the plaster is cracking. This might involve checking for issues with the foundations, damp problems, or even changes in the building’s structure. Sometimes, a professional assessment is needed to figure out if the movement is ongoing and what needs to be done to stabilize it before you can even think about repairing the plaster itself. Ignoring these types of cracks can lead to bigger problems down the line.
Ceiling Repair and Safety Concerns
Okay, so your ceiling is looking a bit dodgy. This isn’t just an aesthetic issue; it’s a genuine safety concern, especially in older Bristol homes where the plaster might be showing its age. If you notice any sagging, bulging, or even cracks appearing, it’s time to pay attention. Ignoring these signs could lead to a partial or even a full collapse, which is incredibly dangerous.
Immediate Actions for a Failing Ceiling
If you see your ceiling starting to droop or crack significantly, the first thing to do is clear the area directly underneath. Move furniture, pets, and people out of the way. If it looks really bad, consider putting up some temporary supports if you have them and know how to use them safely, but honestly, your best bet is to get a professional involved ASAP. Don’t try to patch up a seriously failing ceiling yourself; it’s just not worth the risk.
Assessing the Cause of Ceiling Collapse
Why do ceilings fail? Usually, it’s a combination of factors. Water damage is a big one – a leaky roof or a burst pipe can saturate the plaster and its backing, making it heavy and weak. Old age is another culprit; the materials just degrade over time. Sometimes, structural movement in the house itself can put too much stress on the ceiling. It’s important to figure out what’s causing the problem before you can even think about fixing it properly.
Professional Assessment for Ceiling Integrity
When a ceiling shows signs of serious distress, it’s not a DIY job. You need to call in the experts. They can assess the extent of the damage, identify the root cause, and tell you whether a repair is feasible or if a full replacement is necessary. They’ll also know how to make the area safe while they work. Think of it like this:
Water Damage: Check for stains, damp patches, or signs of leaks from above.
Structural Issues: Look for new cracks in walls that might indicate the house is settling or moving.
Material Age: Older lath and plaster can become brittle and lose its grip over many decades.
Don’t underestimate the potential for a ceiling to fail suddenly. What looks like a minor issue today could become a major hazard very quickly. Always err on the side of caution when it comes to your ceiling’s integrity.
Specialist Plastering for Bristol’s Period Homes
The Importance of Lime Plaster
When you’re dealing with older homes in Bristol, especially those lovely Victorian or Georgian ones, you’ll often find they were built with materials that need a bit of special care. One of the biggest things to know about is lime plaster. Unlike the plaster you find in newer builds, lime plaster is breathable. This is a really big deal for old houses because it lets moisture move in and out of the walls naturally. Trapped moisture is a major enemy of old buildings, leading to damp and decay. Using lime plaster helps your walls ‘breathe’, keeping them healthier for longer.
It’s not just about breathability, though. Lime plaster is also more flexible than modern gypsum plaster. Older buildings tend to shift and settle a little over time, and lime plaster can handle that movement without cracking as easily. For listed properties, using lime plaster is often a requirement from conservation officers to keep things historically accurate.
Repairing Ornate Plasterwork
Bristol’s period homes often boast some pretty impressive decorative plasterwork – think fancy cornices, ceiling roses, and picture rails. Repairing these can be tricky. It’s not like just slapping on some filler. A good plasterer will carefully assess the damage, and if needed, they’ll make moulds from existing intact sections or find period-appropriate patterns to recreate what’s missing. It takes a skilled hand to match the original look and feel.
Here’s a general idea of what goes into repairing ornate plasterwork:
Assessment: Figuring out exactly what’s damaged and how best to fix it.
Mould Making: Creating casts to reproduce missing decorative elements.
Material Matching: Using traditional materials that are compatible with the original plaster.
Skilled Application: Carefully applying the new plaster to blend in perfectly.
Handling Victorian Property Specifics
Victorian properties, in particular, have their own quirks. Many were built with solid walls, which really benefit from that breathable lime plaster we talked about. Using modern plaster on these walls can actually cause problems down the line by trapping moisture. You also have to be super careful around original features like those decorative mouldings – they need protecting during the work. High ceilings are also common, which means scaffolding or towers might be needed, adding to the cost and complexity. And don’t forget, if the property is listed, you might need approval from conservation officers for the materials and methods you use. Getting this right is key to preserving the character of these historic homes.
Here are some common considerations for Victorian plastering:
Wall Construction: Solid walls need breathable plaster.
Original Features: Cornices, ceiling roses, and picture rails need careful handling.
Access: High ceilings often require extra equipment.
Regulations: Listed buildings may have specific material and method requirements.
The Process to Fix Loose Plaster Bristol
So, you’ve noticed some loose plaster in your older Bristol home. It’s a common issue, especially in these beautiful period properties, but it’s definitely something you want to sort out before it becomes a bigger problem. Fixing it isn’t usually a one-step job; it involves a few stages to make sure the repair lasts.
Initial Assessment of Plaster Condition
First things first, you need to figure out just how bad the situation is. Give the suspect areas a gentle tap with your knuckle or a wooden handle. You’re listening for a hollow sound. A solid thud means the plaster is still well-attached to the wall or ceiling behind it. A hollow, drum-like sound? That’s your cue that the plaster has lost its bond with the substrate – it’s detached.
Look closely for any signs of bulging, sagging, or visible cracks. These are all indicators that the plaster is failing. It’s also worth considering the age of the property and any past issues like leaks or damp. Sometimes, plaster just gives up the ghost due to age, but often there’s an underlying cause.
Surface Preparation for Repair
This is arguably the most important part, and you can’t skip it. Any plaster that’s loose or sounds hollow needs to be removed. Trying to patch over it or reattach it rarely works long-term. You’ll need to carefully chip away the failing plaster until you reach solid, well-attached plaster or the original lath or plasterboard. Use a bolster chisel and hammer for this, wearing safety glasses and a dust mask – plaster dust gets everywhere!
Once the loose stuff is gone, you need to prepare the exposed surface. If you’re down to lath, make sure it’s sound and not rotten. If you’re on plasterboard, ensure the edges of the existing plaster are clean and firm. Sometimes, a quick brush to remove dust is enough, but other times you might need to lightly mist the area or even apply a bonding agent, depending on what you’re plastering onto. The goal here is to create a clean, stable surface that the new plaster can grip onto properly.
Applying New Plaster for a Seamless Finish
Now for the actual repair. For smaller areas, you might use a filler or a patching plaster. For larger sections, you’ll likely need to apply a new coat of plaster. If you’re dealing with traditional lath and plaster, you might need to apply a couple of coats – a ‘scumble’ or ‘backing’ coat to fill the void and key into the lath, followed by a ‘finish’ or ‘skim’ coat to create a smooth surface.
Remember, especially in older Bristol homes, the original plaster might have been lime-based. If you’re doing a significant repair, using a lime plaster for the new work can be beneficial as it’s more breathable and flexible, working better with the old building’s structure. Modern gypsum plasters can sometimes be too rigid and might crack later if the building moves slightly.
When applying, try to match the texture of the surrounding plaster as closely as possible. Feather the edges of your repair out so it blends in. Once it’s set, you can sand it down lightly if needed and then it’s ready for priming and painting. Getting this preparation right is key to a repair that looks good and lasts.
Wrapping Up Your Plaster Project
So, there you have it. Fixing loose plaster in your older Bristol home might seem like a big job, and sometimes it is. But with the right steps and a bit of patience, you can definitely get those walls and ceilings looking solid again. Remember, if things look too tricky or you’re dealing with a really big problem, don’t hesitate to call in a pro. They’ve got the tools and know-how to handle even the toughest plaster issues, especially in those charming period properties. Getting it right means your home stays looking great and stays structurally sound for years to come.
Frequently Asked Questions
Why is my plaster bulging or sagging?
When plaster bulges or sags, it means it’s losing its grip on the wall or ceiling. This can happen because of water damage, like a leak that soaks the plaster and makes it heavy. Sometimes, the plaster itself might have separated from the wall, creating a hollow space behind it. Old age can also cause plaster to fail. If you see this, it’s important to get it checked out right away, as it could be a safety risk.
What causes plaster to ‘blow’ and how is it fixed?
Plaster ‘blows’ when it loses its stickiness to the wall or ceiling, forming a hollow pocket. The most common reason for this is moisture. Leaks, damp walls, or even too much condensation can weaken the bond. If the surface wasn’t prepped right before plastering, it can also lead to this problem. To fix it, you have to chip away all the loose plaster until you reach solid material. Then, you prep the area well and apply new plaster. It’s crucial to figure out why it blew in the first place, usually a moisture issue, and fix that too so it doesn’t happen again.
Can I fix cracked plaster without re-plastering the whole wall?
For small, stable cracks, you can often get away with just filling them. You might use a flexible filler or a special caulk made for decorators. For wider cracks, you’ll need to carefully widen the crack a bit, clean it out, and then fill it with a stronger filler, sanding it smooth afterward. However, if the cracks are big, keep getting bigger, or there are many of them, it usually means there’s a bigger problem, like the house settling. In those cases, just filling them won’t work long-term, and you’ll likely need to have the area re-plastered after the main issue is sorted.
What should I do if my ceiling is starting to come down?
A ceiling that’s failing is a serious danger! Your first step is to clear the area underneath it immediately – don’t stand or sit there. Then, you need to call a professional plasterer or a structural engineer right away. They can assess the problem and might need to put up temporary supports to stop it from collapsing completely while they figure out the best way to fix it. It’s not a DIY job; you need expert help to make sure it’s safe.
Is it important to use lime plaster in older Bristol homes?
Yes, it’s often very important! Older homes, especially those in places like Bristol with lots of historic buildings, were often built with materials that need to ‘breathe.’ Lime plaster is breathable, meaning it lets moisture escape naturally. Modern plaster, like gypsum, can trap moisture inside the walls, leading to damp problems and damage over time. Using lime plaster helps keep the building healthy and preserves its original character. It’s also often a requirement for listed buildings to maintain their historical look.
How do you fix plaster that has come away from the wall?
If plaster has detached from the wall, it means the glue holding it has failed. You can’t just stick it back on reliably. The correct way to fix it is to remove all the loose, detached plaster completely until you reach solid material. Then, you need to prepare the exposed surface really well before applying new plaster. Trying to patch over plaster that’s already loose will just lead to another failure down the line. It’s better to remove it properly and replaster to ensure a lasting repair.