
Getting those corners looking sharp can be a bit of a puzzle, right? Whether you’re sprucing up your place or tackling a bigger project, making sure your plastering corners are done right makes a huge difference. It’s not as hard as it looks, honestly. With a few pointers and the right approach, you can get that smooth, professional look without pulling your hair out. Let’s get those edges looking good.
Key Takeaways
Make sure your corner is clean and even before you start plastering corners. Mix your plaster so it’s smooth and easy to use.
Apply plaster to the corner using a putty knife or corner trowel, smoothing as you go. Embed corner beads correctly for a strong base.
Let the plaster dry a bit, then use a damp sponge or more plaster to make the corner look perfect. Feather the edges to blend with the wall.
Once the plaster is totally dry, give the area a light sanding for a smooth finish. Address any uneven spots or cracks as needed.
Paying attention to smoothing and final sanding is what makes your plastering corners look professional and ready for paint.
Preparing For Plastering Corners
Alright, let’s talk about getting those corners ready for plastering. This is where a lot of DIY projects can go sideways if you’re not careful, but honestly, it’s not rocket science. A little bit of prep work goes a really long way, and it makes the actual plastering part so much smoother. Think of it like setting up a good foundation for anything – if that’s shaky, the whole thing can fall apart.
Essential Tools and Materials for Corners
Before you even think about mixing plaster, you need to have your ducks in a row. Running back to the store because you forgot something is a real buzzkill. So, let’s make a quick list of what you’ll likely need. Having the right gear makes the job feel less like a chore and more like you know what you’re doing.
Corner Beads: These are your best friends for sharp, protected corners. Get them cut to size. For thinner plaster jobs, the mesh-winged kind can be pretty handy.
Fixings: You’ll need something to stick those beads on. Depending on your wall, this could be a fast-setting compound, render adhesive, or specific anchors. Just make sure they’re right for your wall type.
Plastering Tools: A hawk to hold your plaster, a trowel for spreading, a long straight edge (like a feather edge), and a spirit level are pretty standard.
Cutting Tools: Tin snips or a saw with a metal blade will be needed to trim those corner beads.
Safety Gear: Don’t forget gloves, eye protection, and a dust mask. Plaster dust isn’t fun to breathe in.
Surface Assessment Before Plastering
Now, before you slap any plaster on, take a good look at the corner itself. Is the wall underneath solid? Is it dusty? Is it reasonably straight? If you’ve got loose bits of old plaster or a wall that’s way out of plumb, your new plaster job is going to look wonky, no matter how good you are with a trowel. You’ll want to brush off any loose stuff and check for dips or bumps with your straight edge. If the wall is super porous, a primer can help. And if you’ve got bigger cracks or the wall is more than a few millimeters off, you might need to do some patching or apply a leveling coat first. This step is all about making sure the surface you’re plastering onto is sound and reasonably true.
Seriously, don’t skip this part. I once tried to plaster over a dodgy bit of wall, and it looked terrible. The plaster just didn’t stick right, and I ended up having to chip it all off and start again. It was a total waste of time and materials.
Proper Plaster Mixing Ratios
Getting the plaster mix right is another one of those things that sounds simple but can trip you up. Too wet, and it’ll run everywhere and won’t hold its shape. Too dry, and it’ll be crumbly and hard to work with. The exact ratio can change depending on the type of plaster you’re using – gypsum, lime, or cement-based plasters all have their own preferences. Always, always check the bag or container the plaster came in for the manufacturer’s instructions. They usually give you a good starting point, like a 2:1 or 3:1 ratio of plaster to water. It’s better to start a bit thicker and add a tiny bit more water if needed, rather than making it too soupy from the get-go. You want a consistency that’s smooth, workable, and holds its shape on your hawk without slumping off.
Mastering Internal Corner Plastering Techniques
So, you’ve got those tricky internal corners to deal with. Don’t sweat it! Getting them right is what separates a DIY job from something that looks like it was done by a pro. It’s all about a bit of patience and knowing a few key moves. Let’s get those corners looking sharp.
Applying the Initial Plaster Coat
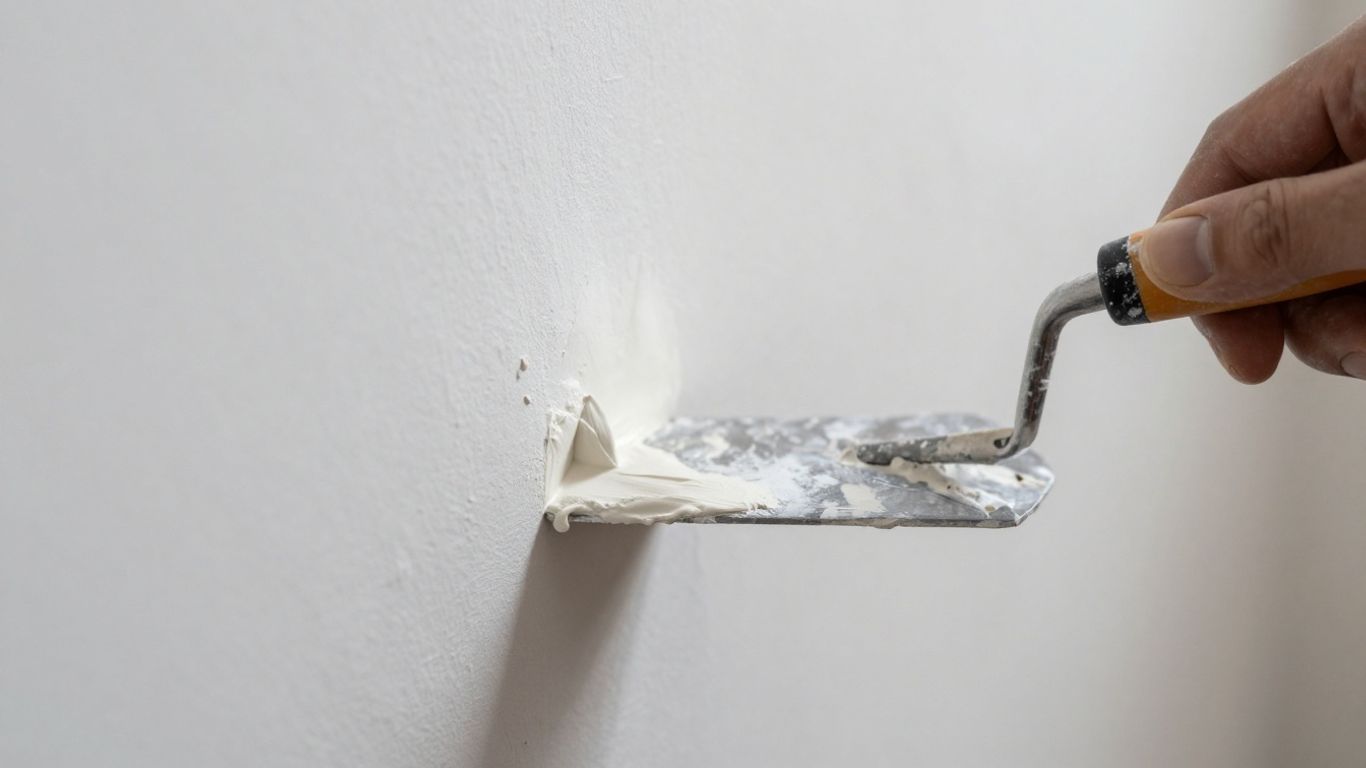
First things first, you need to get some plaster into that corner. Think of it like giving the corner a good, solid base to build on. You don’t want to be stingy here; a decent amount is better than too little. Grab your plaster (make sure it’s mixed to a good, workable consistency – not too runny, not too stiff) and a trowel or a wide putty knife. Load up the tool and spread the plaster generously into the corner, making sure to fill the gap completely. You’re aiming for a nice, even layer that covers the entire surface. Don’t worry too much about making it perfectly smooth just yet; the main goal is to fill the void and create a solid foundation.
The trick here is to apply enough plaster to fully embed any corner bead you might be using, and to create a level surface that bridges the gap between the two walls.
Embedding Corner Beads Correctly
Corner beads are your best friend for strong, straight internal corners. They’re usually metal or plastic strips that give the corner structure and prevent cracks. If you’re using them, now’s the time to get them in place. Some beads have mesh tape attached, which you’ll embed in a layer of joint compound or plaster. Others might need to be fastened first. Whichever type you have, the idea is to press it firmly into the wet plaster you just applied. Use your trowel to smooth the plaster over the bead, feathering it out onto both walls. You want the bead to be fully covered and sitting flush, with no bumps or gaps underneath. This step is super important for a durable and straight corner.
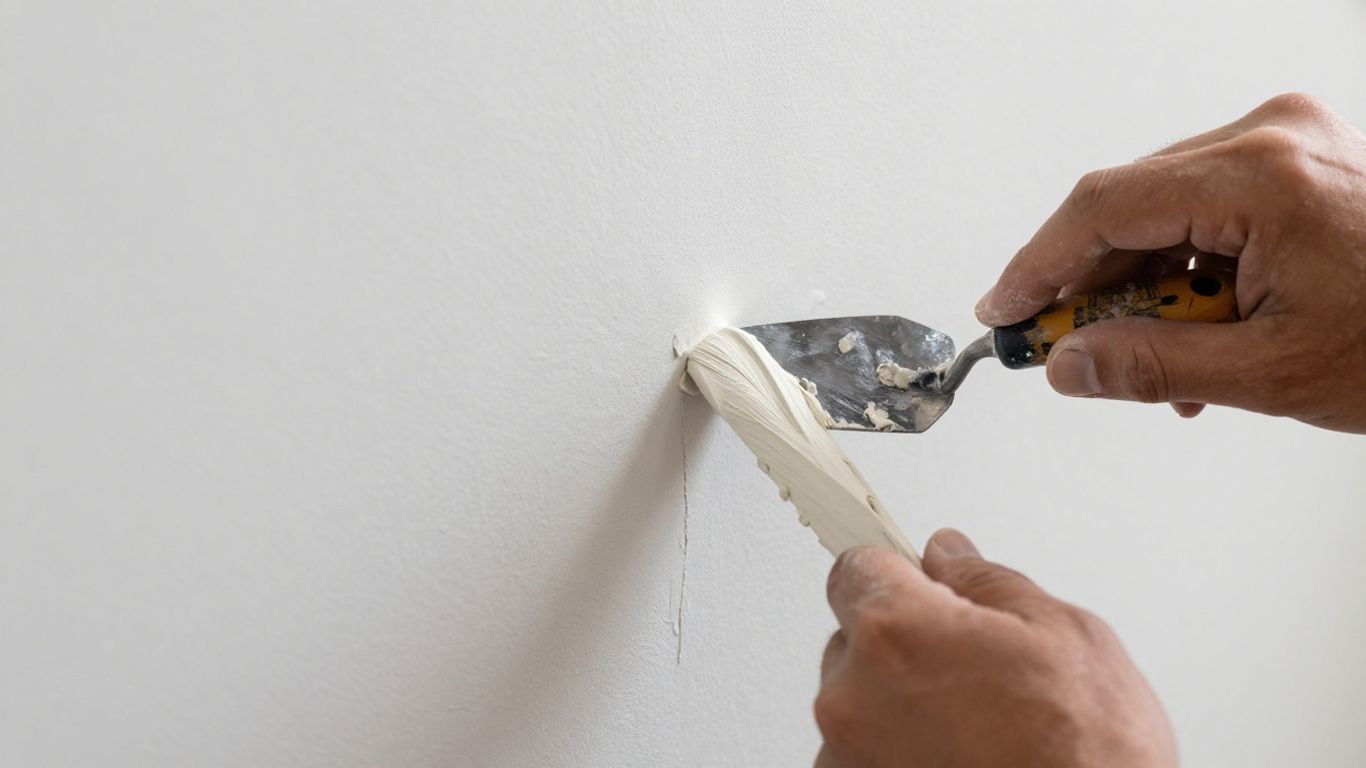
Feathering Edges for a Seamless Blend
Once the initial coat has set a bit (it shouldn’t be completely dry, but firm enough not to pull away), it’s time to start blending. This is where you make that corner disappear into the wall. Feathering means thinning out the plaster as you move away from the corner onto the wall. Use your trowel or putty knife at a shallower angle and pull it away from the corner, leaving a thinner layer of plaster that gradually tapers off. You’re essentially creating a smooth transition so you don’t see a hard line where the plaster starts. Do this on both sides of the corner. You might need a couple of these thin coats, letting each one dry a bit before applying the next, to build up a smooth, even surface that looks like it’s all one piece. The goal is to make the corner look like it was always part of the wall, not an afterthought.
Achieving a Flawless Plaster Corner Finish
So, you’ve gotten the plaster on the corner, and it’s looking pretty good. But we’re not quite done yet, are we? To really make that corner pop and look like a pro did it, there are a few more steps. It’s all about those little details that make a big difference.
The Importance of Smoothing Plaster Corners
Think of smoothing as the final polish. It’s what takes a corner from ‘okay’ to ‘wow.’ A well-smoothed corner means no bumps, no dips, and a clean line that’s ready for paint or whatever you’re planning next. This attention to detail is what separates a DIY job from a professional finish. It’s not just about covering the corner; it’s about making it look like a natural, clean edge of the room.
Skim Coating for Perfection
Sometimes, after the initial plastering and maybe even a light sanding, you might still see tiny imperfections. That’s where skim coating comes in. It’s like giving the corner a super thin, smooth second skin. You’ll want to use a good quality joint compound or a specific skim coat plaster. Apply it thinly with a putty knife or a drywall knife, making sure to feather the edges out onto the wall surface. The goal here is to fill any minor low spots and create an even plane. You might need a couple of thin coats, letting each one dry completely before applying the next. This is where you really get that perfectly flat surface.
Final Sanding for a Silky Surface
Once your skim coat (or coats) are totally dry, it’s time for the final sanding. Don’t go crazy here. You’re not trying to remove material, just knock down any tiny ridges or dust nibs left over. Use a fine-grit sandpaper, maybe 180 or 220 grit. A sanding sponge can be helpful for getting into the corner itself. Wipe away all the dust with a damp cloth or tack cloth. You want that corner to feel smooth as silk to the touch. If it feels rough anywhere, give it another light pass with the sandpaper. This step is what makes the surface feel and look completely finished, ready for primer and paint. If you’re unsure about the best way to apply corner beads, checking out different corner bead options can give you a better idea of what works well with your chosen plastering method.
Here’s a quick rundown of what to aim for:
Smoothness: The corner should feel completely smooth, with no bumps or rough patches.
Straightness: The line of the corner should be clean and straight, without any wavering.
Evenness: The plaster should blend smoothly into the adjacent walls, with no visible ridges or dips.
Taking your time with the final sanding is key. It might seem like a small step, but it has a huge impact on how the finished corner looks and feels. A little extra effort here prevents issues down the line, like paint not adhering properly or visible imperfections after painting.
Remember, practice makes perfect. Don’t get discouraged if your first few corners aren’t magazine-worthy. Keep at it, and you’ll definitely see improvement.
Troubleshooting Common Plastering Corner Issues
Even when you’re careful, plastering corners can sometimes go a bit sideways. Don’t sweat it; most problems have pretty straightforward fixes. It’s all about knowing what to look for and how to deal with it.
Addressing Uneven Surfaces
Sometimes, after the plaster dries, you’ll notice the corner isn’t perfectly straight or smooth. This usually happens if the initial coat was too thick, not spread evenly, or if the corner bead wasn’t set perfectly flat. You might see dips or bumps.
Check the surface: Run your hand over the corner to feel for any high spots or low spots. A good light source angled across the surface can help reveal imperfections.
Light sanding: For minor bumps, a light sanding with medium-grit sandpaper can knock down the high spots. Be gentle so you don’t damage the plaster underneath.
Apply a skim coat: If there are noticeable dips or the surface is generally uneven, you’ll want to apply a thin skim coat of plaster or joint compound. Use a wide putty knife or a drywall knife to spread it thinly and evenly, feathering the edges out onto the adjacent walls. The goal is to fill the low spots and create a level plane.
Sand again: Once the skim coat is completely dry, sand it smooth. You might need to do a couple of thin coats if the unevenness is significant.
Remember, patience is key here. Trying to fix a really uneven corner with one thick coat of plaster often makes it worse. Thin, multiple applications are usually the way to go.
Repairing Cracked Corners
Cracks in plaster corners are pretty common. They can pop up due to the building settling, temperature changes causing expansion and contraction, or sometimes from impact.
Assess the crack: Is it a hairline crack, or is it wider and deeper? If it’s very wide or you suspect movement in the wall itself, you might need to investigate further. For most typical cracks, a repair is manageable.
Clean and widen: Carefully clean out the crack. Sometimes, you need to slightly widen it into a ‘V’ shape using a utility knife. This gives the new plaster something to grip onto.
Apply joint compound: Fill the crack with joint compound using a putty knife. Press it in firmly to make sure it fills the void completely. Smooth it flush with the surrounding surface.
Add reinforcement (if needed): For wider or recurring cracks, consider embedding a piece of drywall tape (paper or mesh) into the wet joint compound. Smooth it down firmly, ensuring it’s fully covered.
Multiple coats and sanding: Let the first coat dry completely. You’ll likely need a second, and possibly a third, thin coat to build up the surface and make it perfectly smooth. Sand lightly between coats and after the final coat dries.
Avoiding Common Mistakes
Learning from others’ slip-ups can save you a lot of hassle. Here are a few things to watch out for:
Rushing the drying time: Trying to speed up the process by applying the next coat too soon can lead to cracks and a weak finish. Always let each layer dry thoroughly.
Over-sanding: When sanding, it’s easy to go too hard and sand through the plaster, exposing the corner bead or the layer underneath. Use a light touch and check your progress often.
Using the wrong tools: Trying to plaster a sharp internal corner with a standard drywall knife can be tough. A dedicated corner trowel or even a flexible putty knife designed for corners makes a huge difference in getting a clean, sharp line.
Not enough plaster: Leaving voids behind the corner bead or not filling the corner completely means you’re setting yourself up for cracks later on. Make sure the corner is fully packed with plaster.
Advanced Techniques for Plastering Corners
Exploring Decorative Corner Profiles
So, you’ve gotten pretty good at the standard plaster corner, huh? That’s awesome. But what if you want to add a little something extra, a bit of architectural flair? That’s where decorative corner profiles come in. Think of them as the jewelry for your walls.
Bull-nose beads give you a softer, rounded edge. These are great if you’ve got little ones running around – less chance of a nasty bump. They also just look a bit more gentle, less harsh than a sharp corner.
Shadow gap beads are super popular right now, especially if you’re going for that modern, minimalist look. They create this cool effect where the walls look like they’re floating, with a neat little gap between them. It’s subtle but really makes a statement.
Stop beads are handy too. They’re used to create a clean edge where you want to change materials, textures, or even colors. So, if you’re doing a feature wall or a different finish in one area, a stop bead gives you a really crisp line.
These aren’t just for looks, though. They help create a strong, defined edge that’s easier to plaster around and maintain. Getting the right profile can really change the feel of a room.
Plastering Curved Walls
Plastering a straight corner is one thing, but what about curves? This is where things get a bit more interesting. For those nice, flowing curved walls, you’ll want to look at flexible beads. These are usually made of PVCu, and they’re designed to bend without kinking or cracking. You can shape them to follow the curve of your wall, giving you a perfect arch or rounded corner every time. It takes a bit of patience to get them to sit just right, but the result is totally worth it. You’re basically coaxing the bead into place, making sure it hugs the curve smoothly.
Integrating Lighting with Corner Beads
This is where things get really fancy. Imagine having subtle lighting built right into your corners. You can do this by using perforated reveal beads. These beads have little holes in them. You install them like a regular bead, but then you can actually tuck LED strip lights behind them. When you turn them on, the light glows softly from the corner, creating a really modern and atmospheric effect. It’s a great way to add a design feature that’s both functional and stylish. It’s a bit like giving your walls a gentle hug of light.
When working with advanced corner profiles or integrating lighting, remember that precision is key. Even a small misalignment can be noticeable, especially with decorative elements. Take your time, use the right tools, and don’t be afraid to make small adjustments as you go. The goal is a clean, professional look that stands out.
Here’s a quick rundown of what you might need for these advanced techniques:
Flexible PVCu beads for curved walls
Perforated reveal beads for lighting integration
Appropriate adhesive or fixings for the chosen bead type
LED strip lights and compatible power supply (if integrating lighting)
A steady hand and a good eye for detail!
Wrapping It Up
So, there you have it. Getting those corners and edges looking sharp takes a bit of know-how and some patience, but it’s totally doable. We’ve talked about getting your stuff ready, mixing the plaster just right, and how to actually get it on the wall without making a mess. Remember, the first time might not be perfect, and that’s okay. Just keep at it, and you’ll start seeing those smooth, clean lines appear. Before you know it, your walls will look like they were done by a pro, ready for whatever you want to do next.
Frequently Asked Questions
What are the most important tools for plastering corners?
To get a great finish on corners, you’ll need some key tools. A putty knife or drywall knife is essential for smoothing. A corner trowel helps shape the plaster perfectly. You’ll also need a hawk to hold your plaster mix and a good quality plaster itself. Don’t forget sandpaper for that final smooth touch!
How do I mix plaster correctly for corners?
Getting the plaster mix just right is super important. It should be smooth and easy to spread, not too runny or too stiff. Always check the instructions on the plaster bag, but a common starting point is mixing two parts plaster with one part water. Stir it well until it looks like thick cream.
What’s the best way to apply plaster to an inside corner?
Start by putting a good amount of plaster onto the corner using your trowel. Spread it evenly, making sure to fill the space completely. Then, use your putty knife to smooth it out, blending it into the walls on either side. Think of it like making a smooth bridge between the two walls.
How can I fix a corner that looks uneven after plastering?
If your corner isn’t perfectly straight, don’t worry! Once the plaster is a bit dry, you can use a damp sponge or a little more plaster to gently smooth out any bumps or low spots. After it’s completely dry, a light sanding will help even things out for a flawless look.
What causes cracks in plastered corners, and how do I fix them?
Cracks often happen if the plaster dries too fast or if there’s movement in the wall. To fix a crack, gently scrape it open a little, clean out any loose bits, and then fill it with fresh plaster. Smooth it out and let it dry completely. For bigger cracks, you might need to add a bit of mesh tape before plastering.
Is it hard to get a professional finish on plaster corners?
It can be tricky at first, but with practice, anyone can get a professional finish! The key is to be patient and pay close attention to detail. Making sure the surface is well-prepared and taking your time when smoothing and sanding will make a big difference. Don’t be afraid to try – each time you do it, you’ll get better!